Let’s Encrypt With Let’s Encrypt
But Why?
A few years back, there was a big push for HTTPS Everywhere, big enough for Google to modify their page ranking for it.
over the past few months we’ve been running tests taking into account whether sites use secure, encrypted connections as a signal in our search ranking algorithms. We’ve seen positive results, so we’re starting to use HTTPS as a ranking signal.
Considering that a big reason for me to have this blog is so I can own my search results, I decided to take some time to get that sweet green lock everyone seemed to like so much. Not only would I LOCK in my Google search superiority over the other Rami Massouds, but I would also not have to worry as much about logging into a WordPress admin over plain text!!
Locking It Down
To accomplish this task, I followed the advice of a post, on a now-defunct blog, which stepped me through how to add HTTPS to a WordPress blog with a $10 Comodo PositiveSSL Certificate from Namecheap. Namecheap being my favorite domain registrar, this seemed like a solid deal.
Turns out renewing an SSL certificate is a pain, as I only do it once a year, each time it comes up, I’ve completely forget how it’s done. Plus, this blog barely gets me “notoriety”, much less makes me any money, so spending more on a certificate isn’t great.

Enter: Let’s Encrypt!
Let’s Encrypt is a free, automated, and open certificate authority (CA), run for the public’s benefit. Let’s Encrypt is a service provided by the Internet Security Research Group (ISRG).
Talk about solving all of my (SSL) problems! With Let’s Encrypt in the picture, not only will my blog have that swanky green lock for free, but renewals are a bash command away!
Let’s Encrypt has been around for a while, but only left beta relatively recently. I could say beta status was the reason I didn’t do this sooner, but it was definitely laziness, and until I got the renewal notice from Namecheap for my SSL certificate, it was a problem for Tomorrow’s Rami.
Well, now Tomorrow’s Rami has become Today’s Rami, so time to figure out how to do this!
Certbot & Verify
Since the EFF is awesome, they actually have a handy step by step guide for to use Certbot to set up your SSL certificate on just about any combination of OS and webserver. As awesome as they are, for my combination of Nginx and Debian 7 Wheezy, I have one of the “harder” install paths. At the time of writing this post, Certbot is not available through Apt on Debian 7 (though it is in 8), and it does not support auto-installation for Nginx.

That’s alright though, even the hard way is still easy!
Since Wheezy doesn’t have a packaged version of Certbot, I need to first download it directly from the EFF’s site
$ wget https://dl.eff.org/certbot-autoDon’t forget to make the download executable! That’s probably safe right? Downloading and executing random scripts from people on the internet??

Haha of course I’m kidding! I would never blog about running random bash scripts until a security-minded friend reviewing the post points out that’s dumb and I should actually verify the script.

Luckily for me, the EFF thought about everything, and lays out exactly how to verify the integrity of the Certbot script. Their instructions use gpg2, but on most systems gpg is already bundled, and works for our purposes.
First, download the EFF’s signature file to verify the Certbot script with, using the --timestamping flag to only download it if you don’t have the latest version.
$ wget --timestamping https://dl.eff.org/certbot-auto.ascThen, using the id from the EFF’s instructions, we import the key for Certbot
$ gpg --recv-key A2CFB51FA275A7286234E7B24D17C995CD9775F2
gpg: requesting key CD9775F2 from hkp server keys.gnupg.net
gpg: key CD9775F2: "Let's Encrypt Client Team " not changed
gpg: Total number processed: 1
gpg: unchanged: 1
Finally, we specify that the EFF’s key “is as trustworthy as one of your own secret keys” with the --trusted-key option, and verify Certbot with the signature file we downloaded.
$ gpg --trusted-key 4D17C995CD9775F2 --verify certbot-auto.asc certbot-auto
gpg: Signature made Tue 14 Jun 2016 07:55:45 PM EDT using RSA key ID CD9775F2
gpg: Good signature from "Let's Encrypt Client Team "
If you feel like using gpg2, just sudo apt-get install gnupg2 then run the same commands above. For more insight into gpg vs gpg2 check out this answer on StackExchange.
Getting Certified
Okay now we can make Certbot executable
$ chmod a+x certbot-autoAs they say in the instructions “Since your server architecture doesn’t yet support automatic installation you should probably use the certonly command to obtain your certificate.” If you run ‘certbot-auto with just certonly then it will interactively step through the setup. Or you can be like me, and pre-set the how, what, and where:
$ ./certbot-auto certonly --webroot --webroot-path /www/ramimassoud/web_root/ --domain www.ramimassoud.comThis command will request a SSL certificate for www.ramimassoud.com, and because of the --webroot option, verify control of the domain by adding a file to the given webroot for the Let’s Encrypt validation server to check. But a note from the docs:
Note that to use the webroot plugin, your server must be configured to serve files from hidden directories. If /.well-known is treated specially by your webserver configuration, you might need to modify the configuration to ensure that files inside /.well-known/acme-challenge are served by the webserver.
This could be an issue if you use source control in your webroot and lockdown hidden directories to keep your .git or .svn directories safe from prying eyes.
Once you run that command, Certbot is going to request sudo access so it can install its dependencies with Apt. One of the prompts before installing the main dependencies asks if you’d like to install the Apache plugin. Since I am 100% NginX, I skipped that:
To use the Apache Certbot plugin, augeas needs to be installed from wheezy-backports.
Would you like to enable the wheezy-backports repository [Y/n]? n
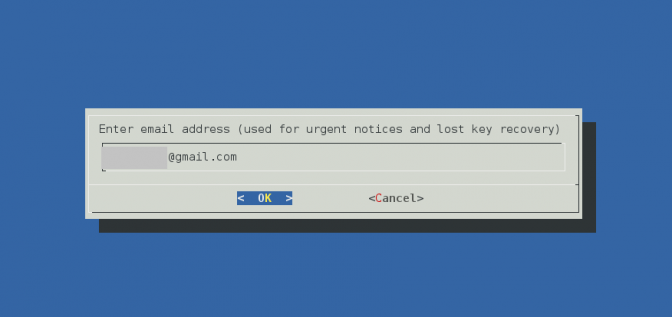
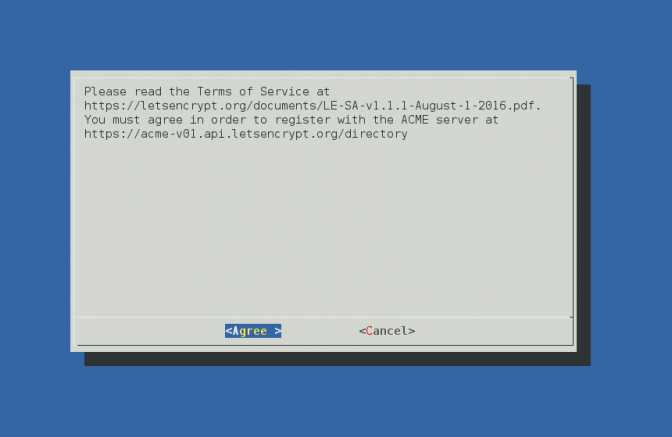
After all of the dependencies finish downloading, installing, and configuring, you’ll get a couple of prompts from Certbot. First to enter in your email in case you lose your keys, and to agree to their Terms of Service.
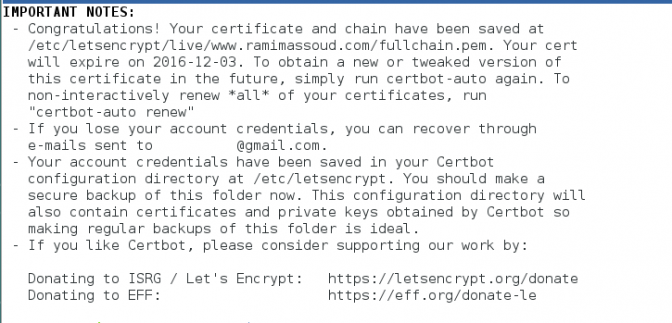
With that out of the way, the most important output, your shiny new certificate of awesomeness!
Making The Switch
Now that we have this sweet new certificate to use, time to update the Nginx config to actually use it.

Assuming you had SSL previously (otherwise look elsewhere for an unabridged config), locate the config file for the site you are swapping the new certificate into. Find and update the following three lines with the output from Certbot’s success message:
ssl_certificate /etc/letsencrypt/live/www.ramimassoud.com/fullchain.pem;
ssltrustedcertificate /etc/letsencrypt/live/www.ramimassoud.com/chain.pem; # Optional
sslcertificatekey /etc/letsencrypt/live/www.ramimassoud.com/privkey.pem;
Note that ssltrustedcertificate is optional since you only need it if you have ssl_stapling enabled
Once you save your changes to the config file, make sure to test it before you restart the webserver:
$ sudo service nginx configtest
[ ok ] Testing nginx configuration:.
If that worked then restart Nginx
$ sudo service nginx restartThen you can use Chrome’s handy “Security” tab in the dev tools to verify your hard work
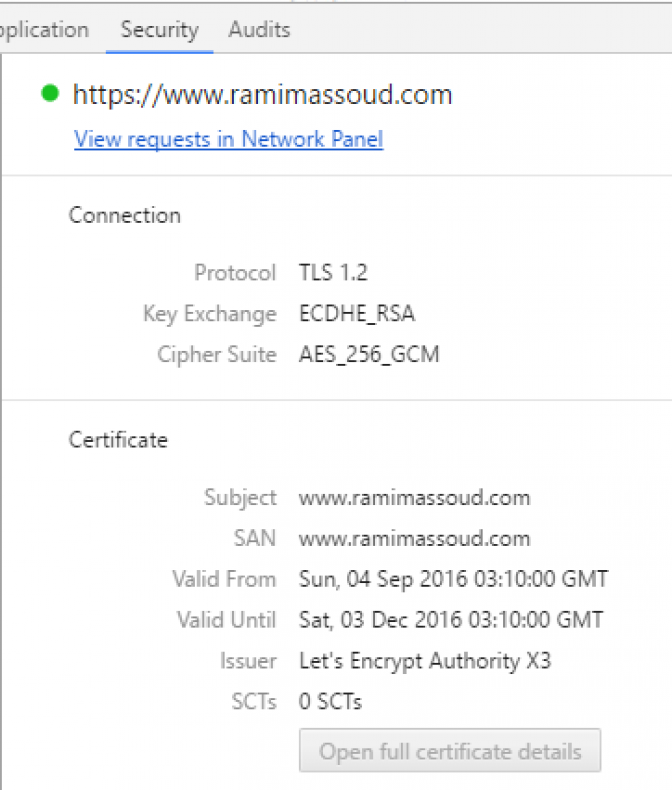
BOOYA!
Automate Your Life
Thankfully, like everything else, setting up auto-renew with Certbot is also stupid simple. This is especially important since they only last 90 days, just long enough for you to forget to do it.
As a sanity check, use the --dry-run flag to make sure everything is alright
$ /path/to/certbot/certbot-auto renew --dry-run
-------------------------------------------------------------------------------
Processing /etc/letsencrypt/renewal/www.ramimassoud.com.conf
-------------------------------------------------------------------------------
** DRY RUN: simulating 'certbot renew' close to cert expiry
** (The test certificates below have not been saved.)


Congratulations, all renewals succeeded. The following certs have been renewed:
/etc/letsencrypt/live/www.ramimassoud.com/fullchain.pem (success)
** DRY RUN: simulating 'certbot renew' close to cert expiry
** (The test certificates above have not been saved.)
As long as you get that congrats from Certbot, all that remains is to create a cron job to automatically renew your certificate for you. To do that, you’ll want to add a job to the root user, and since they recommend running the renew check twice a day, best to use crontab.
$ sudo crontab -eThat will open up a file where all a user’s cron jobs should be stored, just add this line and save the file:
0 0,12 * * * /path/to/certbot/certbot-auto renew --quiet --no-self-upgradeThis will run that command at midnight and 12 pm (local server time), every day. Once you exit, you should see “crontab: installing new crontab” as a success message. Which is the nice thing about using crontab to add jobs: it will validate them for you!
With that, you’re done, and have one less thing to worry about each year!

Update February 2018
Apparently, after switching to Let's Encrypt I was very regularly updating/restarting my server. Recently I went approximately 90 days without doing that. How do I know that you might ask?
Because I got an alert my certificate expired 😱
After frantically re-examining my configuration, trying to force a certificate renewal, and sitting baffled for at least twenty minutes, I finally realized the issue! For the renewed certificate to be served, you have to restart Nginx 😒
Thankfully the Certbot tooling thinks of everything, even if I didn't, and offers a post-renew hook. Set it to restart Nginx and you'll be all set no matter how long you neglect your server!
0 0,12 * * * /path/to/certbot/certbot-auto renew --quiet --no-self-upgrade --post-hook "/etc/init.d/nginx restart"